Chevrolet Cruze Repair Manual: Removal Procedure
Warning: Refer to Approved Equipment for Collision Repair Warning in the Preface section.
Warning: Refer to Glass and Sheet Metal Handling Warning in the Preface section.
- Disable the SIR System. Refer to SIR Disabling and Enabling.
- Disconnect the negative battery cable. Refer to Battery Negative Cable Disconnection and Connection.
- Remove all related panels and components.
- Visually inspect the damage. Repair as much of the damage as possible.
- Remove the sealers and anti-corrosion materials from the repair area, as necessary. Refer to Anti-Corrosion Treatment and Repair.
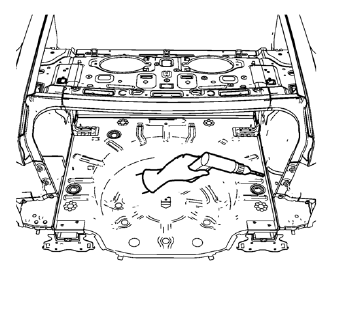
- Locate and mark all the necessary factory welds of the rear compartment floor panel.
- Note the number and location of weld studs for installation of the service assembly.
- Drill all factory welds. Note the number and location of welds for installation of the service assembly.
- Remove the damaged rear compartment floor panel.
 Rear Compartment Floor Panel Sectioning (MAG-Welding)
Note: According to different corrosion warranties, only the
regional mandatory joining methods are allowed. ...
 Installation Procedure
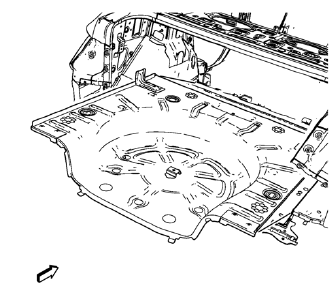
Align the rear compartment floor panel.
Drill 8 mm (5/16 in) for plug welding along the edges of the rear compartment
floor panel as noted from the original panel.
Clean and prepare th ...
Other materials:
Installation Procedure
Align the front side door outer panel.
Verify the fit of the front side door outer panel.
Clamp the front side door outer panel
into position.
Pre-flanging the flange with BO-6396 pliers and BO-6392 tool kit .
Continue to hammer in stages along the hem flanges.
...
Door Ajar Indicator Description and Operation
Door Ajar Indicator System Components
The door ajar indicator system consists of the following components:
Body control module (BCM)
Instrument cluster
Driver information center
Driver door latch
Passenger door latch
Left rear door latch
Right rear door latch
Liftgate door latch
...
Rear Compartment Lid Hinge Torque Rod Replacement
Preliminary Procedure
Remove rear compartment lid. Refer to Rear Compartment Lid Replacement.
Special Tools
BO-125 Torque Rod Lifter
For equivalent regional tools, refer to Special Tools.
Rear Compartment Lid Hinge Torque Rod - Right Side
Tip
Only use the special tool to remove and i ...
