Chevrolet Cruze Repair Manual: Removal Procedure
Warning: Refer to Glass and Sheet Metal Handling Warning in the Preface section.
- Disable the SIR System. Refer to SIR Disabling and Enabling.
- Disconnect the negative battery cable. Refer to Battery Negative Cable Disconnection and Connection.
- Remove the rear side door. Refer to Rear Side Door Replacement.
- Remove the rear side door outside handle. Refer to Rear Side Door Outside Handle Replacement.
- Remove the sealers and anti-corrosion materials from the repair area, as necessary. Refer to Anti-Corrosion Treatment and Repair.
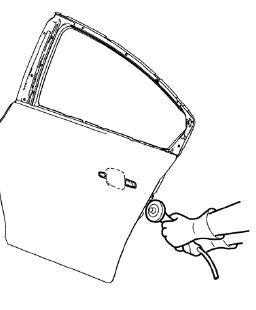
- Grind the edges of the rear side door outer panel to separate the outer door panel from the door shell.
- Remove the rear side door outer door panel.
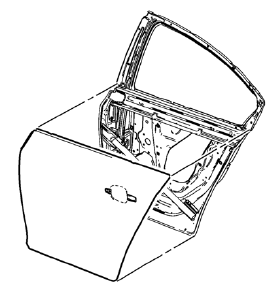
- Remove the sealers and anti-corrosion materials from the repair area, as necessary. Refer to Anti-Corrosion Treatment and Repair.
- Straighten the edges of the door shell.
 Rear Side Door Outer Panel Replacement (MIG-Brazing)
Special Tools
BO-6396 Bonding Pliers
BO-6392 Flanging Tool Kit
For equivalent regional tools, refer to Special Tools.
Note: According to different corrosion warranties, only the
regional m ...
 Installation Procedure
Apply structural adhesive on the flanges of the rear side door inner
panel where the rear side door outer panel bears on.
Align the rear side door outer panel.
Verify the fit of the rear sid ...
Other materials:
What Will You See after an Airbag Inflates?
After the frontal airbags and seat-mounted side impact airbags inflate, they
quickly deflate, so quickly that some people may not even realize an airbag inflated.
Roof-rail airbags may still be at least partially inflated for some time after
they inflate. Some components of the airbag module ma ...
Removal Procedure
Warning: Refer to Approved Equipment for Collision Repair Warning in the
Preface section.
Warning: Refer to Glass and Sheet Metal Handling Warning in the Preface section.
Disable the SIR System. Refer to SIR Disabling and Enabling.
Disconnect the negative battery cable. Refer ...
Child Seat Restraint System
Warning: A child in a rear-facing child restraint can be seriously
injured if the right-front passengers air bag inflates. This is because the
back of a rear-facing child restraint would be very close to the inflating air
bag. NEVER use a rear-facing child restraint in this vehicle. If a
forwa ...
