Chevrolet Cruze Repair Manual: Shock Absorber Disposal
Warning: Use the proper eye protection when drilling to prevent metal chips from causing physical injury.
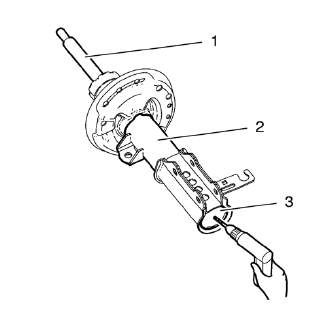
- Clamp the strut in a vise horizontally with the rod ( 1) completely extended.
- Drill a hole in the strut at the center of the end cap (3) using a 5 mm (3/16 in) drill bit. Gas or a gas/oil mixture will exhaust when the drill bit penetrates the strut. Use shop towels in order to contain the escaping oil.
- Remove the strut from the vise.
- Hold the strut over a drain pan vertically with the hole down.
- Move the rod (1) in and out of the tube (2) to completely drain the oil from the strut.
 Strut Assembly Replacement
Special Tools
CH 49375 Wrench
For equivalent regional tools, refer to Special Tools.
Removal Procedure
Raise and the vehicle. Refer to Lifting and Jacking the Vehicle.
Remove the tire and whe ...
 Strut, Strut Component, or Spring Replacement
Special Tools
CH-6068 Spring Tensioner Device
CH-6066 Holding Device
For equivalent regional tools, refer to Special Tools.
Disassembly Procedure
Remove the strut assembly. Refer &n ...
Other materials:
Rear Vision Camera (RVC)
This vehicle may have the RVC system. Read this entire section before using it.
The RVC system can assist the driver when backing up by displaying a view of
the area behind the vehicle.
WARNING
The RVC system does not display children, pedestrians, bicyclists, animals,
or any other object loc ...
Steering Linkage Inner Tie Rod Replacement (Hydraulic Power Steering)
Special Tools
CH-6247 Removal and Installation Tool for the Steering Linkage Inner Tie Rod
For equivalent regional tools, refer to Special Tools.
Removal Procedure
Raise and support the vehicle. Refer to Lifting and Jacking the
Vehicle.
Remove the tire and wheel assembly. Refer to ...
Exterior Lighting Systems Description and Operation
Exterior Lamps
The exterior lighting system consists of the following lamps if equipped:
Headlamps
Daytime Running Lamps (DRL)
Front fog lamps
Rear fog lamps
Park, tail and license lamps
Turn signal lamps
Hazard warning lamps
Repeater lamps
Stop lamps
Backup lamps
Low Beam ...
