
Chevrolet Cruze Owners Manual: Storing the Tire Sealant and Compressor Kit
The tire sealant and compressor kit is located in the trunk, under the load floor, behind an access panel.
To remove the kit:
1. Open the trunk.
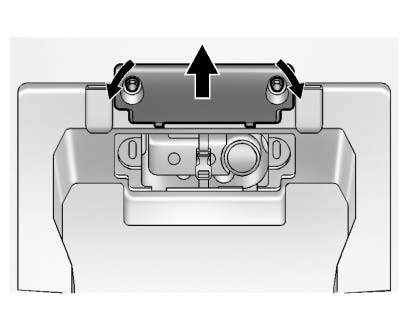
2. Turn the left knob counterclockwise and the right knob clockwise, 90 degrees, at the same time. Then pull the access panel rearward and up to remove it.
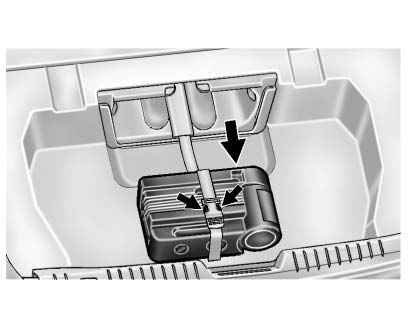
3. Pull the inflator kit rearward.
Squeeze the two tabs of the quick release buckle to remove the tire sealant and compressor kit.
To store the inflator kit, reverse the steps.
 Tire Sealant and Compressor Kit
WARNING
Idling a vehicle in an enclosed area with poor ventilation is dangerous. Engine
exhaust may enter the vehicle. Engine exhaust contains carbon monoxide (CO) which
cannot be seen or smelled ...
 Tire Changing
Removing the Spare Tire and Tools
To access the spare tire and tools:
1. Retainer Nut.
2. Tool Bag Tether.
3. Tool Bag.
4. Spare Tire.
1. Open the trunk.
2. Lift the load floor.
3. T ...
Other materials:
Radio Frequency Statement
This vehicle has systems that operate on a radio frequency that comply with Part
15 of the Federal Communications Commission (FCC) rules and with Industry Canada
Standards RSS-GEN/210/220/310.
Operation is subject to the following two conditions:
1. The device may not cause harmful interferenc ...
Removal Procedure
Warning: Refer to Approved Equipment for Collision Repair Warning in the
Preface section.
Warning: Refer to Collision Sectioning Warning in the Preface section.
Warning: Refer to Glass and Sheet Metal Handling Warning in the Preface section.
Disable the SIR System. Refer to SIR Dis ...
Rear Spring Replacement
Removal Procedure
Raise and suitably support the vehicle. Refer to Lifting and Jacking the
Vehicle.
Support the rear axle with a tall jack stand near the shock absorber.
Remove the lower shock bolt. Refer to Shock Absorber Replacement.
Using the tall jack stands, slowly lower the rear a ...
