Chevrolet Cruze Repair Manual: Vehicle Certification, Tire Placard, Anti-Theft, and Service Parts ID Label

Vehicle Certification Label
The vehicle certification label is located on the driver door and displays the following assessments:
Gross Vehicle Weight Rating (GVWR)
Gross Axle Weight Rating (GAWR), front and rear
The gross vehicle weight (GVW) is the weight of the vehicle and everything it carries. The gross vehicle weight must not exceed the Gross Vehicle Weight Rating. Include the following items when figuring the GVW:
- The base vehicle weight (factory weight)
- The weight of all vehicles accessories
- The weight of the driver and the passengers
- The weight of the cargo
- Name of Manufacturer
- Gross Vehicle Weight Rating
- Gross Axle Weight Rating (Front, Rear)
- Canadian Safety Mark (w/RPO Z49)
- Certification Statement
- Vehicle Class Type (Pass Car, etc.)
- Vehicle Identification Number
- Date of Manufacture (Mo/Yr)
Tire Placard
The tire placard label is located on the driver door and displays the following assessments:
- Specified Occupant Seating Positions
- Maximum Vehicle Capacity Weight
- Original Equipment Tires Size
- Tire Pressure, Front, Rear, and Spare (Cold)
Service Parts ID Label
The vehicle service parts identification label is located in the rear compartment under the spare tire cover. The label is use to help identify the vehicle original parts and options.
- Vehicle Identification Number
- Engineering Model Number (Vehicle Division, Line, and Body Style)
- Interior Trim Level and Decor
- Exterior (Paint Color) WA Number
- Paint Technology
- Special Order Paint Colors and Numbers
- Vehicle Option Content
Anti-Theft Label
- The Federal law requires that General Motors label certain body parts on
this vehicle with the VIN. The purpose of the law
is to reduce the number of motor vehicle thefts by helping in the tracing
and recovery of parts from stolen vehicles.
Labels are permanently affixed to an interior surface of the part. The label on the replacement part contains the letter R, the manufacturer's logo, and the DOT symbol.
The anti-theft label must be covered before any painting, rustproofing procedures, and uncovered after the procedures.
Failure to follow the precautionary steps may result in liability for violation of the Federal Vehicle Theft Prevention Standard and possible suspicion to the owner that the part was stolen.
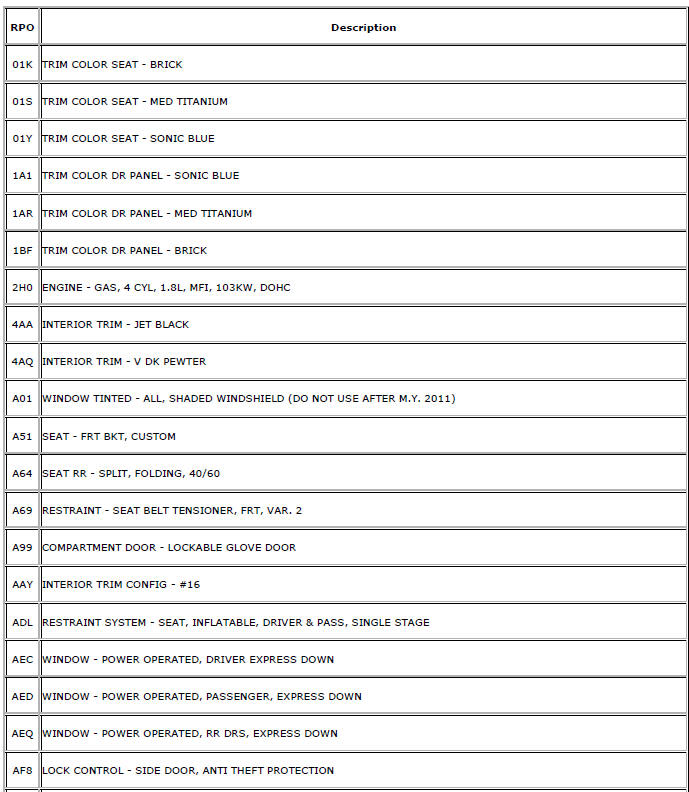
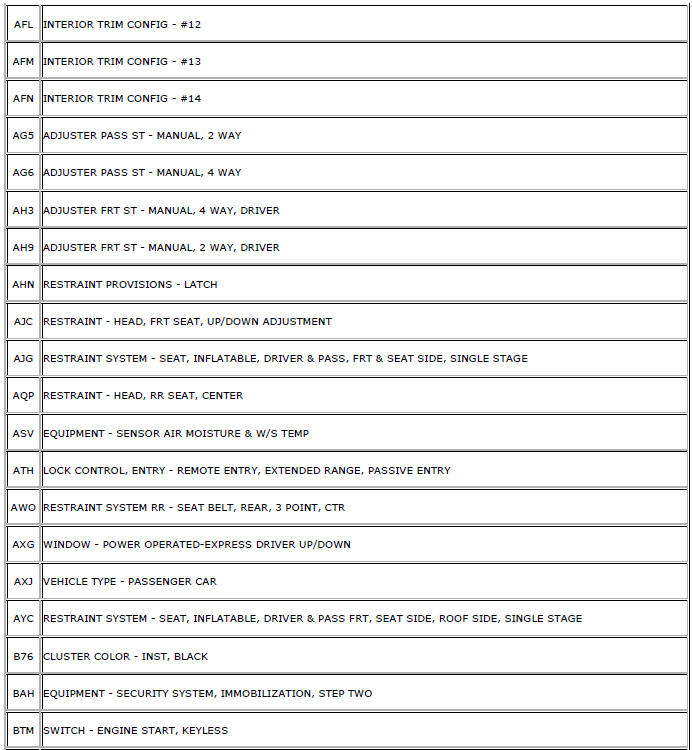
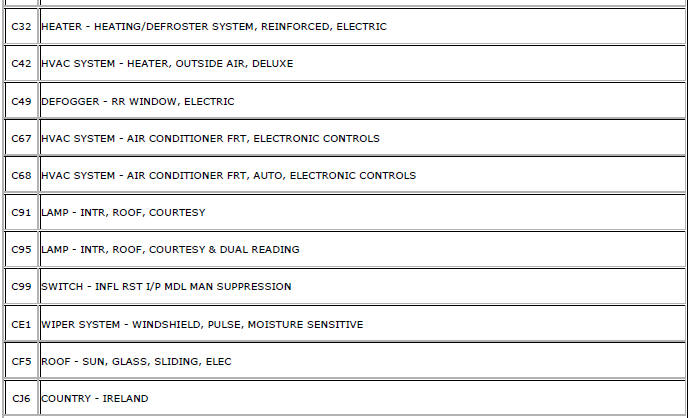
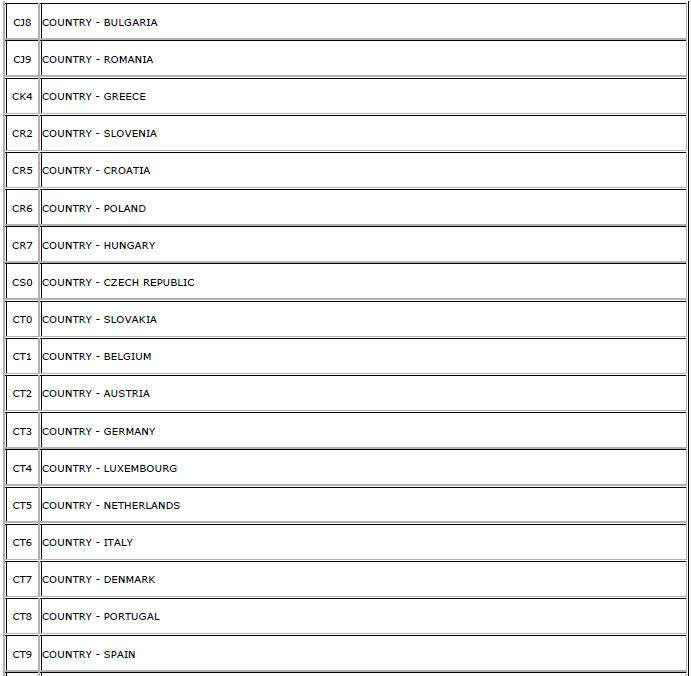
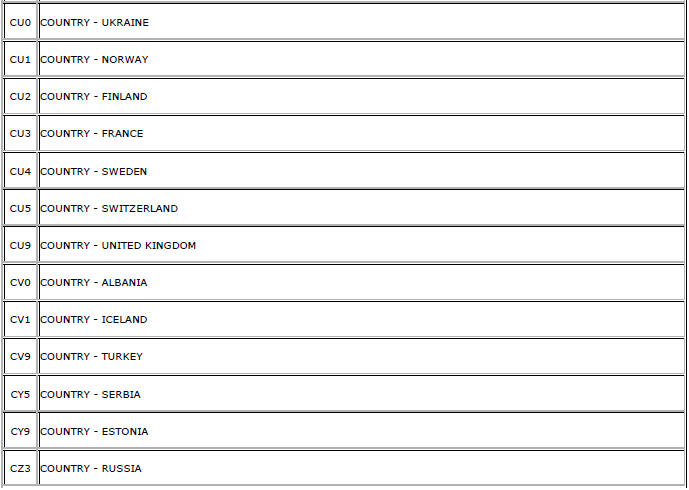
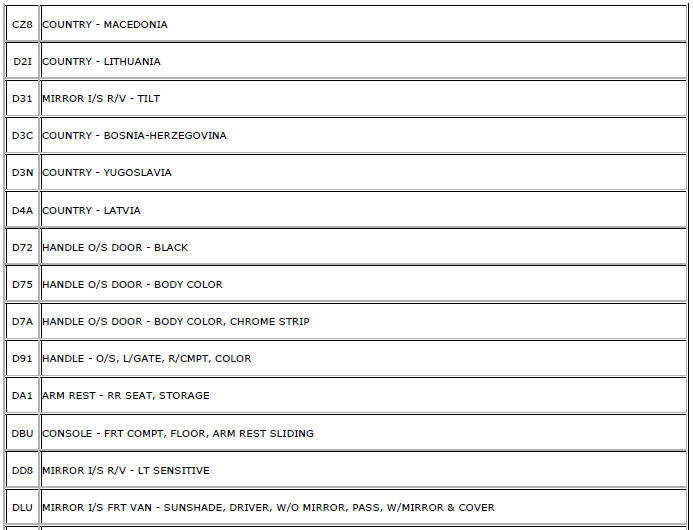
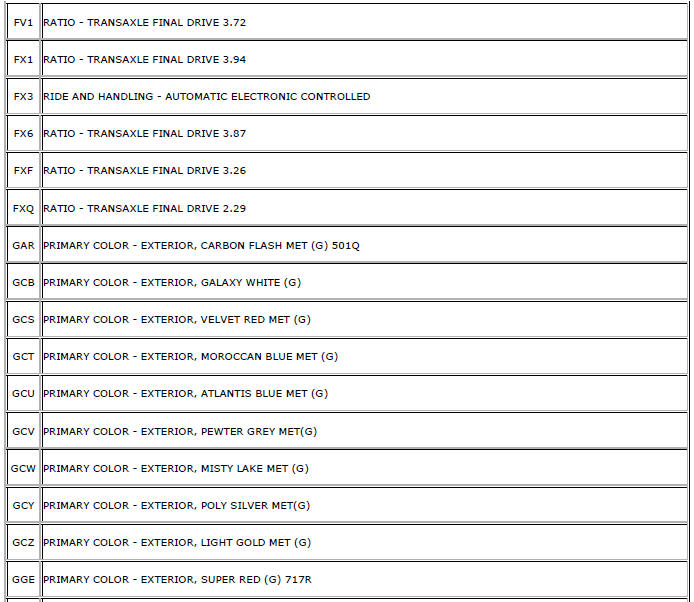
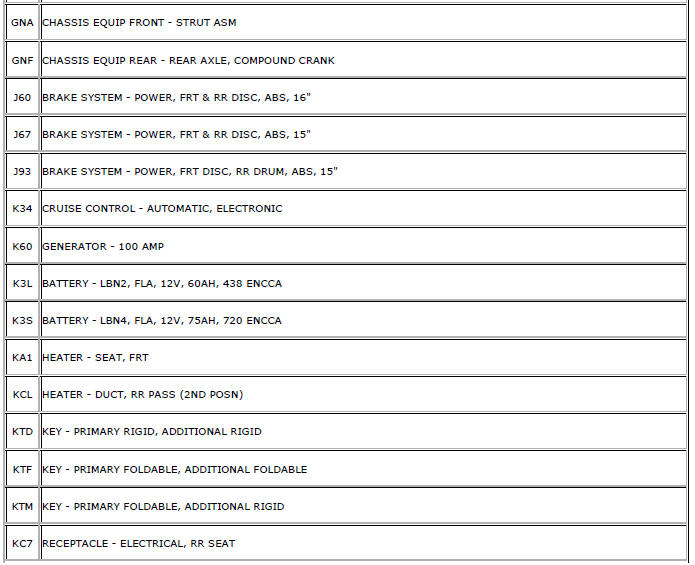
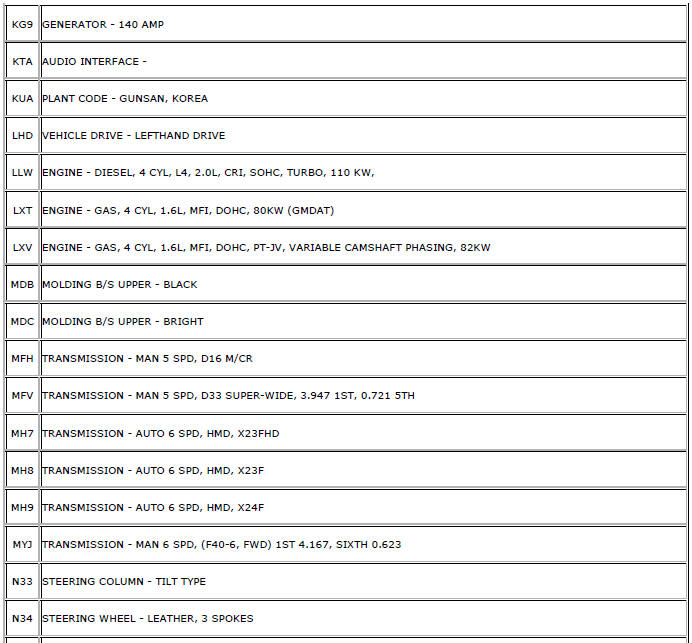
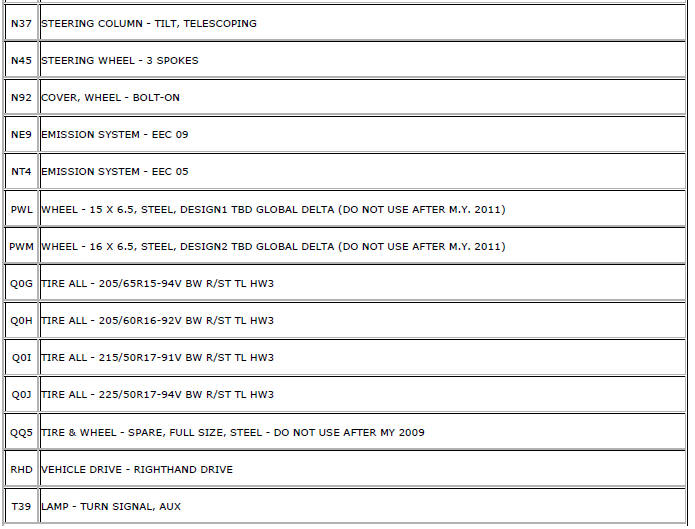
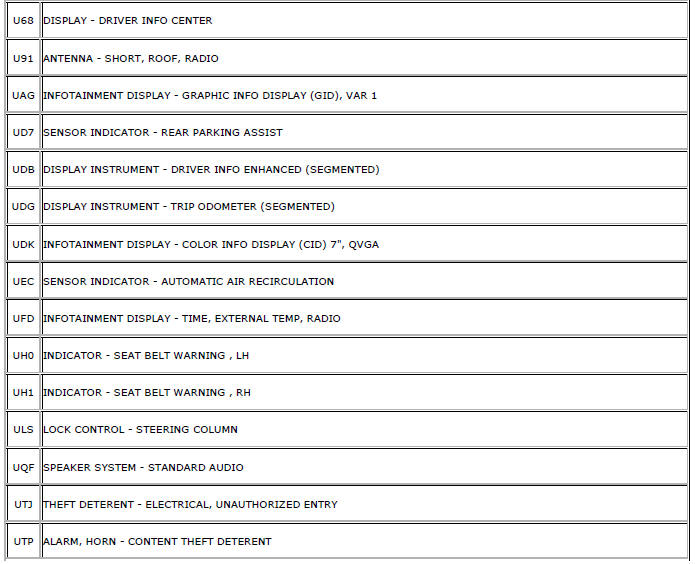
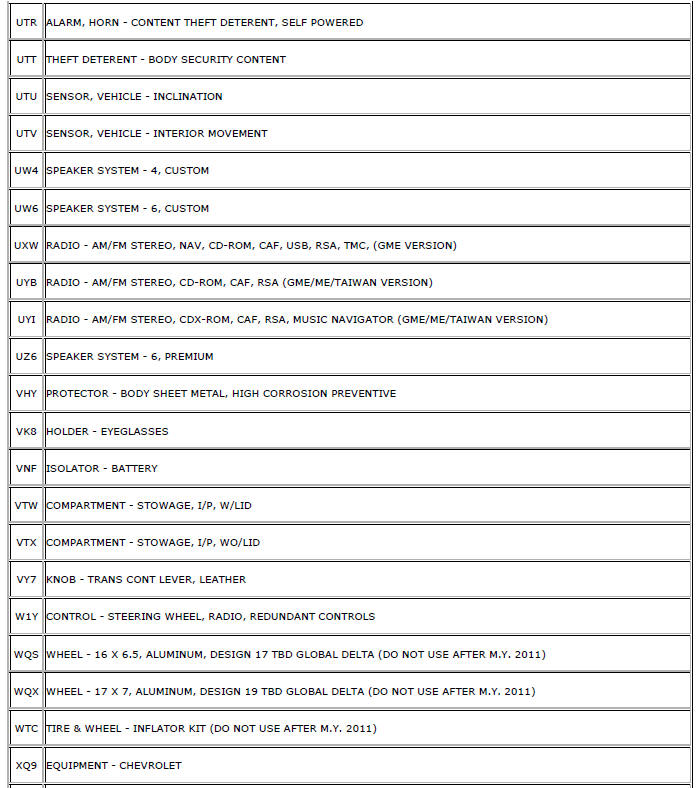
RPO Code List (GME)
The following table provides the description of the Regular Production Option (RPO) codes that are available on the vehicle. The vehicle's RPO list is printed on the Service Parts Identification Label.


 Vehicle, Engine and Transmission ID and VIN Location, Derivative and Usage
Note:: Graphic shows exemplary VIN.
The VIN plate is the legal identifier of the vehicle. The VIN plate is
located on the upper left corner of the instrument panel (I/P) and can
be seen throug ...
 Fasteners
Table 1: Metric Prevailing Torque Fastener Minimum Torque Development
Table 2: English Prevailing Torque Fastener Minimum Torque Development ...
Other materials:
Vehicle Personalization
The audio system controls are used to access the personalization menus for customizing
vehicle features.
CONFIG (Configuration): Press to access the Configuration Settings menu.
MENU/SEL: Press the center of this knob to enter the menus and select
menu items. Turn the knob to scroll through th ...
Strut Assembly Replacement
Special Tools
CH 49375 Wrench
For equivalent regional tools, refer to Special Tools.
Removal Procedure
Raise and the vehicle. Refer to Lifting and Jacking the Vehicle.
Remove the tire and wheel assembly. Refer to Tire and Wheel Removal and
Installation.
Separate the brake hose ...
Information Displays
Driver Information Center (DIC)
The DIC displays information about your vehicle. It also displays warning messages
if a system problem is detected.
DIC Operation and Displays
The DIC has different displays which can be accessed by using the DIC buttons
on the turn signal lever.
The DIC displ ...
