Chevrolet Cruze Repair Manual: Rear Side Door Window Replacement
Preliminary Procedures
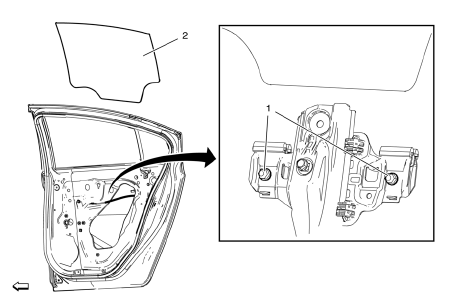
- Position the window approximately half way down in the door.
- Remove the water deflector. Refer to Rear Side Door Water Deflector Replacement.
- Remove the outer sealing strip. Refer to Rear Side Door Window Outer Sealing Strip Replacement.
- Rear Side Door Window Regulator Sash Nut (Qty: 2)
Caution: Refer to Fastener Caution in the Preface section.
Tighten 9 N·m (80 lb in)
- Rear Side Door Window
Procedure
- Loosen the window regulator sash nuts, pull upward to release the window from the sash.
- Rotate the rear door window as necessary to remove it from the door.
 Rear Side Door Window Adjustment
Warning: Refer to Glass and Sheet Metal Handling Warning in the Preface
section.
Warning: Refer to Express Window Down Warning in the Preface section.
Preliminary Procedures
Remove the r ...
 Rear Side Door Stationary Window Replacement
Preliminary Procedures
Remove the rear side door trim panel. Refer to Rear Side Door Trim
Replacement.
Remove the rear side water deflector. Refer to Rear Side Door Water
Deflect ...
Other materials:
Clock
The infotainment system controls are used to access the time and date settings
through the menu system. For vehicles with a connective radio or navigation system,
see the infotainment manual.
Setting the Time and Date
To set the time and date for the radio with CD:
1. Press CLOCK.
2. Select ...
Tire Chains
WARNING
Do not use tire chains. There is not enough clearance. Tire chains used on
a vehicle without the proper amount of clearance can cause damage to the brakes,
suspension, or other vehicle parts. The area damaged by the tire chains could cause
loss of control and a crash. Use another type ...
Odometer
The odometer shows how far the vehicle has been driven, in either kilometers
or miles.
This vehicle has a tamper-resistant odometer. The digital odometer will read
999,999 if it is turned back.
If the vehicle needs a new odometer installed, it must be set to the mileage
total of the old odom ...
