Chevrolet Cruze Repair Manual: Removal Procedure
- Disable the SIR System. Refer to SIR Disabling and Enabling.
- Disconnect the negative battery cable. Refer to Battery Negative Cable Disconnection and Connection.
- Remove all related panels and components.
- Visually inspect the damage. Repair as much of the damage as possible.
- Remove the sealers and anti-corrosion materials from the repair area, as necessary. Refer to Anti-Corrosion Treatment and Repair.
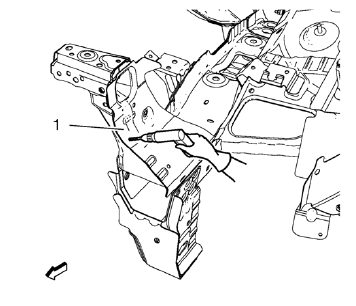
- Locate and mark all the necessary factory welds of the front end sheet metal cross panel reinforcement (1).
- Drill all factory welds. Note the number and location of welds for installation of the service assembly.
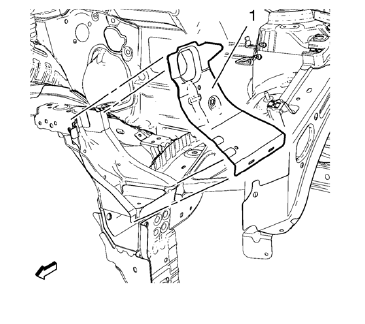
- Remove the front end sheet metal cross panel reinforcement (1).
- Drill all factory welds.
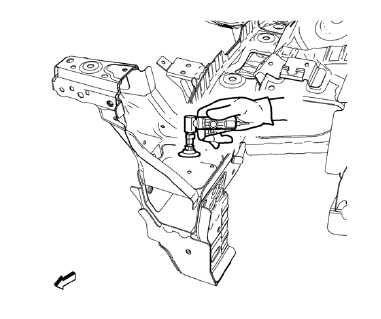
- Grind factory welds of the front end upper tie bar.
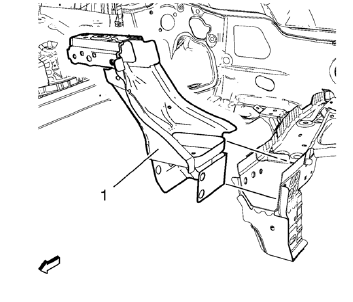
- Remove the front end upper tie bar (1).
 Front End Upper Tie Bar Replacement (MAG-Welding)
Note: According to different corrosion warranties, only the
regional mandatory joining methods are allowed. ...
 Installation Procedure
Position the front end upper tie bar (1) on the vehicle.
Verify the fit of the front end upper tie bar.
Clamp the front end upper tie bar into position.
Weld seam accordingly.
...
Other materials:
Installation Procedure
Create 6 x 20 mm (4/16 x 11/16 in) slots for MIG-brazing along the upper
edges of the service panel as noted from the original
panel.
Clean and prepare the attaching surfaces for brazing and spot welding.
Position the body lock pillar inner panel on the vehicle.
Verify the ...
Wiper/Washer System Description and Operation
Wiper/Washer System Components
The wiper/washer system consists of the following electrical components:
Windshield Wiper Relay
Windshield Wiper Speed Control Relay
Windshield Washer Pump Relay
Rain Sensor (optional)
Windshield Washer Fluid Pump
Windshield Wiper Motor
Window Wiper/Wa ...
Transmission Messages
SERVICE TRANSMISSION
This message displays if there is a problem with the transmission. See your dealer.
TRANSMISSION HOT — IDLE ENGINE
This message displays and a chime sounds if the transmission fluid in the vehicle
gets hot. Driving with the transmission fluid temperature high can cause dama ...
