Chevrolet Cruze Repair Manual: Removal Procedure
Warning: Refer to Approved Equipment for Collision Repair Warning in the Preface section.
Warning: Refer to Glass and Sheet Metal Handling Warning in the Preface section.
- Disable the SIR System. Refer to SIR Disabling and Enabling.
- Disconnect the negative battery cable. Refer to Battery Negative Cable Disconnection and Connection.
- Remove all related panels and components.
- Visually inspect the damage. Repair as much of the damage as possible.
- Remove the sealers and anti-corrosion materials from the repair area, as necessary. Refer to Anti-Corrosion Treatment and Repair.
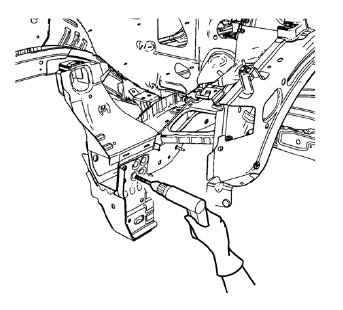
- Locate and mark all the necessary factory welds and weld seams of the drivetrain and front suspension frame front support.
- Drill out front flange of front suspension support frame from above through the front compartment side rail.
Note: Drill holes are necessary for later plug welds.
- Drill all factory welds. Note the number and location of welds for installation of the service assembly.
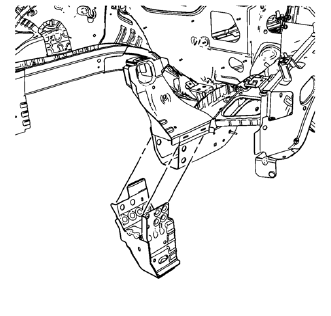
- Remove the drivetrain and front suspension frame front support.
 Drivetrain and Front Suspension Frame Front Support Replacement (MAG-Welding)
Note: According to different corrosion warranties, only the
regional mandatory joining methods are allowed. ...
 Installation Procedure
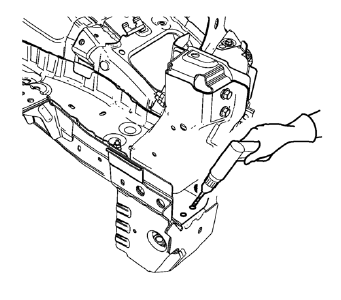
Drill 8 mm (5/16 in) for plug welding along the edges of the drivetrain
and front suspension frame front support as noted from the
original panel.
Clean and prepare the attaching &n ...
Other materials:
Hood
To open the hood:
1. Pull up on the hood release handle. It is located inside the vehicle to the
left of the steering column.
2. Go to the front of the vehicle and push the secondary hood release handle
toward the driver side of the vehicle.
3. Lift the hood and release the hood prop fr ...
Installation Procedure
Drill 8 mm (5/16 in) for plug welding along the edges of the body side
outer lower panel as noted from the original panel.
Note: If the location of the original plug weld holes can not be
determined, space the plug weld holes every 40 mm (1½ in).
Clean and prepare the attac ...
Installation Procedure
Remove all mounds or loose pieces of urethane adhesive from the
pinch-weld area.
Inspect for any of the following problems in order to help prevent
future breakage of the window:
High weld
Solder spots
Hardened sealer
Any other obstruction or irregularity in the pinch-weld fla ...
