Chevrolet Cruze Repair Manual: Removal Procedure
Warning: Refer to Approved Equipment for Collision Repair Warning in the Preface section.
- Disable the SIR System. Refer to SIR Disabling and Enabling.
- Disconnect the negative battery cable. Refer to Battery Negative Cable Disconnection and Connection.
- Remove all related panels and components.
- Visually inspect the damage. Repair as much of the damage as possible.
- Remove the sealers and anti-corrosion materials from the repair area, as necessary. Refer to Anti-Corrosion Treatment and Repair.
- Locate and mark all factory welds.
- Drill all factory welds. Note the number and location of welds for installation of the service assembly.
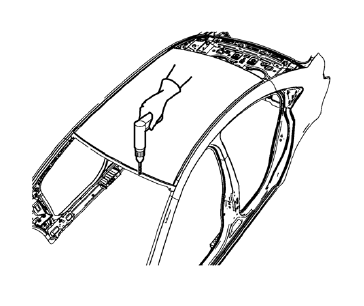
- Cut the adhesive with an appropriate tool.
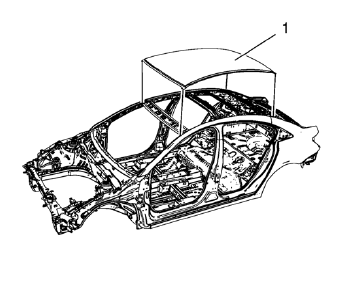
- Remove the damaged roof panel (1).
 Roof Outer Panel Replacement (MIG-Brazing)
Note: According to different corrosion warranties, only the
regional mandatory joining methods are allowed. ...
 Installation Procedure
Clean and prepare the attaching surfaces for welding.
Apply one-part windshield urethane adhesive as noted from the original
panel.
Position the roof panel (1) on the
...
Other materials:
Installation Procedure
Cut the front compartment front rail in corresponding locations to fit
the remaining original panel. The sectioning joint should be
trimmed to allow a gap of one-and-one-half-times the metal thickness at the
sectioning joint.
Create a 50 mm (2 in) backing plate from the unused porti ...
Thread Repair
General purpose thread repair kits are available commercially.
Warning: Refer to Safety Glasses Warning in the Preface section.
Note: Refer to the thread repair kit manufacturer's instructions
regarding the size of the drill and which tap to use.
Always avoid any buildup of chips. Back ou ...
Backup Lamp Replacement
Preliminary Procedures
Remove the rear compartment sill trim plate. Refer to Rear Compartment
Sill Trim Plate Replacement.
Disconnect the electrical harness connector from the backup lamp socket.
Back Up Lamp Nut (Qty: 4)
Caution: Refer to Fastener Caution in the Preface ...
