Chevrolet Cruze Repair Manual: Removal Procedure
Warning: Refer to Approved Equipment for Collision Repair Warning in the Preface section.
Warning: Refer to Glass and Sheet Metal Handling Warning in the Preface section.
- Disable the SIR System. Refer to SIR Disabling and Enabling.
- Disconnect the negative battery cable. Refer to Battery Negative Cable Disconnection and Connection.
- Remove all related panels and components.
- Visually inspect the damage. Repair as much of the damage as possible.
- Remove the sealers and anti-corrosion materials from the repair area, as necessary. Refer to Anti-Corrosion Treatment and Repair.
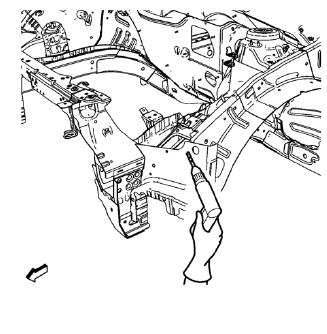
- Locate and mark all the necessary factory welds of the front wheelhouse panel rear reinforcement.
- Drill all factory welds. Note the number and location of welds for installation of the service assembly.
- Remove the front wheelhouse panel rear reinforcement.
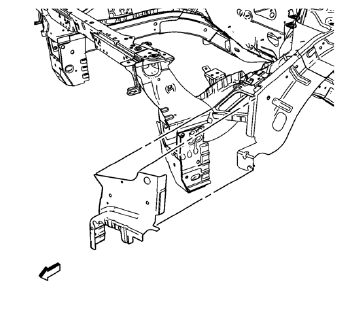
 Front Wheelhouse Panel Rear Reinforcement Replacement (MAG-Welding)
Note: According to different corrosion warranties, only the
regional mandatory joining methods are allowed. ...
 Installation Procedure
Drill 8 mm (5/16 in) for plug welding along the edges of the front
wheelhouse panel rear reinforcement as noted from the original
panel.
Drill 8 mm (5/16 in) for plug welding whe ...
Other materials:
Front Seat Track Synchronization
The fore/aft manual adjuster is composed of an inboard track assembly (5),
and outboard track (4) assembly, and an adjuster handle (1).
Each track assembly is made of an upper track (2) and a lower track (3). Both
tracks need to be aligned prior to installing in the vehicle.
To align t ...
California Fuel Requirements
If the vehicle is certified to meet California Emissions Standards, it is designed
to operate on fuels that meet California specifications. See the underhood emission
control label. If this fuel is not available in states adopting California Emissions
Standards, the vehicle will operate satisf ...
Removal Procedure
Warning: Refer to Approved Equipment for Collision Repair Warning in the
Preface section.
Disable the SIR System. Refer to SIR Disabling and Enabling.
Disconnect the negative battery cable. Refer to Battery Negative Cable
Disconnection and Connection.
Remove all related panels and ...
