Chevrolet Cruze Repair Manual: Shock Absorber Disposal
Warning: Gas charged shock absorbers contain high pressure gas. Do not remove the snap ring from inside the top of the tube. If the snap ring is removed, the contents of the shock absorber will come out with extreme force which may result in personal injury.
Warning: To prevent personal injury, wear safety glasses when centerpunching and drilling the shock absorber. Use care not to puncture the shock absorber tube with the centerpunch.
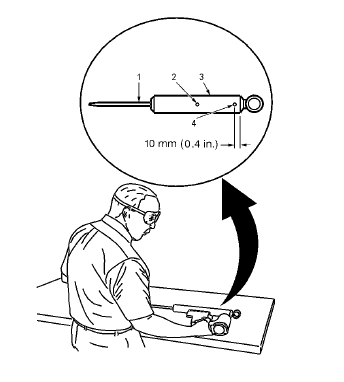
- Make an indentation 10 mm (0.4 in) from the bottom (4) of the tube (3) using a centerpunch.
- Clamp the shock absorber in a vise horizontally with the shock absorber rod (1) completely extended.
- Drill a hole in the shock absorber at the centerpunch (4) using a 5 mm (3/16 in) drill bit. Gas or a gas/oil mixture will exhaust when the drill bit penetrates the shock absorber. Use shop towels in order to contain the escaping oil.
- Make an indentation in the middle (2) of the tube (3) with a centerpunch.
- Drill a second hole in the shock absorber at the centerpunch (2) using a 5 mm (3/16 in) drill bit. Oil will exhaust when the drill bit penetrates the shock absorber. Use shop towels in order to contain the escaping oil.
- Remove the shock absorber from the vise. Hold the shock absorber over a drain pan horizontally with the holes down. Move the rod (1) in and out of the tube (3) to completely drain the oil from the shock absorber.
 Shock Absorber Replacement
Removal Procedure
Raise and suitably support the vehicle. Refer to Lifting and
Jacking the Vehicle.
Remove the tire and wheel assembly. Refer to Tire and Wheel Removal and
Installati ...
 Rear Spring Insulator Replacement
Removal Procedure
Raise and suitably support the vehicle. Refer to Lifting and Jacking the
Vehicle.
Support the rear axle with a tall jack stand near the shock absorber.
Remove the lower sh ...
Other materials:
Interior Trim and Paneling
Specifications
Front Side Door Window Switch Bezel Replacement
Preliminary Procedure
Remove the front side door trim. Refer to Front Side Door Trim Replacement.
Front Side Door Window Switch Bezel Screw (Qty: 8)
Caution: Refer to Fastener Caution in the Preface section.
Tighten
...
Strut, Strut Component, or Spring Replacement
Special Tools
CH-6068 Spring Tensioner Device
CH-6066 Holding Device
For equivalent regional tools, refer to Special Tools.
Disassembly Procedure
Remove the strut assembly. Refer to Strut Assembly
Replacement.
Install the strut to the CH-6066 holder (5).
Tens ...
Inflatable Restraint Passenger Presence Detection System - If Equipped
Note: The passenger presence detection system includes an ECU and a
sensor mat that can be serviced separately. After repairing or
replacing any part of the passenger presence detection system, the system must
be rezeroed in order to function properly.
The passenger presence detection system i ...
