Chevrolet Cruze Repair Manual: Rear Spring Insulator Replacement
Removal Procedure
- Raise and suitably support the vehicle. Refer to Lifting and Jacking the Vehicle.
- Support the rear axle with a tall jack stand near the shock absorber.
- Remove the lower shock bolt. Refer to Shock Absorber Replacement.
- Using the tall jack stands, slowly lower the rear axle in order to remove tension from the rear springs.
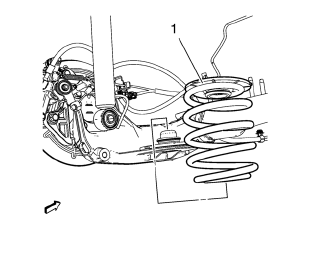
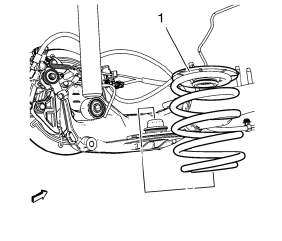
- Remove the spring (1).
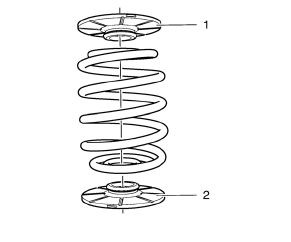
- Remove the lower and upper rear spring insulators (1, 2).
Installation Procedure
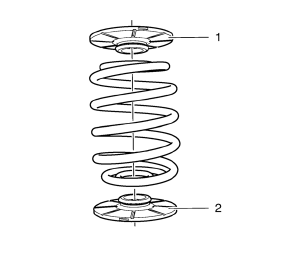
Note: The rear springs are indexed with the colored tag toward the rear of the vehicle. No up/down or side to side orientation is required.
- Install the lower and upper rear spring insulators (1, 2).
- Install the spring (1) with the spring tag toward the rear of the vehicle, making sure the lower rear is seated into the lower spring seat.
- Using the jack stands, raise the rear axle in order to compress the rear springs.
- Install the lower shock absorber bolts. Refer to Shock Absorber Replacement.
- Lower the vehicle.
 Shock Absorber Disposal
Warning: Gas charged shock absorbers contain high pressure gas. Do
not remove the snap ring from inside the top of the tube. If the snap
ring is removed, the contents of the shock absorber will com ...
 Rear Spring Replacement
Removal Procedure
Raise and suitably support the vehicle. Refer to Lifting and Jacking the
Vehicle.
Support the rear axle with a tall jack stand near the shock absorber.
Remove the lower sh ...
Other materials:
Radio Frequency Statement
This vehicle has systems that operate on a radio frequency that comply with Part
15 of the Federal Communications Commission (FCC) rules and with Industry Canada
Standards RSS-GEN/210/220/310.
Operation is subject to the following two conditions:
1. The device may not cause harmful interferenc ...
Radio Data System (RDS)
RDS features are available for use only on FM stations that broadcast RDS information.
With RDS, the radio can:
• Seek to stations broadcasting the selected type of programming.
• Receive announcements concerning local and national emergencies.
• Display messages from radio stations.
Thi ...
Removal Procedure
Warning: Refer to Approved Equipment for Collision Repair Warning in
the Preface section.
Warning: Refer to Glass and Sheet Metal Handling Warning in the Preface
section.
Disable the SIR System. Refer to SIR Disabling and Enabling.
Disconnect the negative battery cable. Refer to Bat ...
