Chevrolet Cruze Repair Manual: Instrument Panel and Console Trim
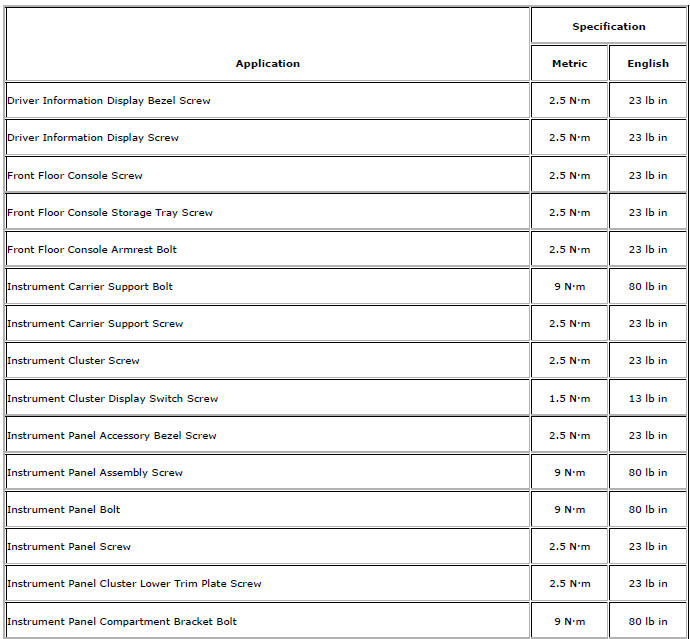
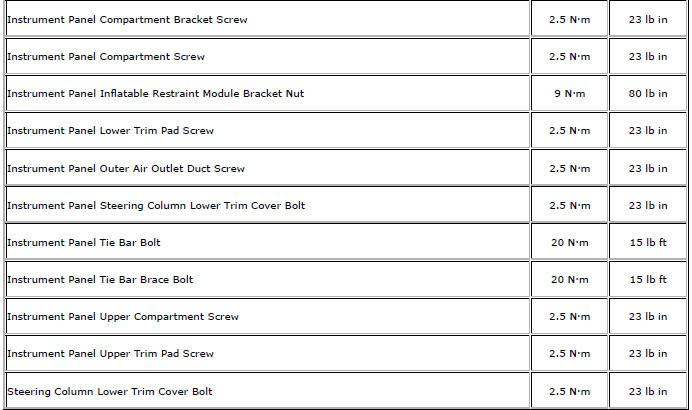
Specifications
Instrument Panel Insulator Seal Replacement
Preliminary Procedure
Remove the instrument panel assembly. Refer to Instrument Panel Assembly Replacement.
- Instrument Panel Insulator Seal
Steering Column Upper Trim Cover Replacement
Preliminary Procedure
Remove the instrument cluster. Refer to Instrument Cluster Replacement
- Instrument Panel Steering Column Upper Trim Cover Assembly
Steering Column Lower Trim Cover Replacement
Preliminary Procedure
Remove the steering column upper trim cover. Refer to Steering Column Upper Trim Cover Replacement.
- Steering Column Lower Trim Cover Bolt (Qty: 3) Caution: Refer to Fastener Caution in the Preface section.
Tighten 2.5 N·m (23 lb in)
- Instrument Panel Steering Column Lower Trim Cover Assembly
Instrument Panel Center Upper Molding Replacement
Instrument Panel Center Upper Molding Assembly
Procedure
- Use a flat-bladed plastic trim tool to remove the instrument panel center upper molding.
- When replacing the instrument panel center upper molding, remove both instrument panel center air outlet. Refer to Instrument Panel Center Air Outlet Replacement.
Instrument Panel Upper Trim Panel Replacement - Right Side
Preliminary Procedure
Remove the instrument panel compartment. Refer to Instrument Panel Compartment Replacement
- Instrument Panel Upper Trim Panel Screw (Qty 2) Caution: Refer to Fastener Caution in the Preface section.
Tighten 2.5 N·m (22 lb in)
- Instrument Panel Upper Trim Panel Assembly
Instrument Panel Upper Trim Panel Replacement - Left Side
Preliminary Procedure
Remove instrument panel cluster. Refer to Instrument Cluster Replacement
- Instrument Panel Upper Trim Panel - Left Side
Tip
When replacing the instrument panel upper trim panel, transfer the instrument panel outer air outlet.
- Instrument Panel Accessory Bezel Replacement
- Instrument Panel Lower Trim Pad Cover Replacement
- Instrument Panel Cluster Lower Trim Plate Replacement
- Instrument Panel Lower Trim Panel Replacement - Right Side
- Instrument Panel Upper Compartment Replacement
- Instrument Panel Compartment Replacement
- Instrument Panel Upper Trim Pad Insert Replacement
- Instrument Panel Assembly Replacement
- Instrument Panel Tie Bar Replacement (Right Hand Drive)
- Instrument Panel Wiring Harness Replacement
- Front Floor Console Storage Tray Replacement
- Front Floor Console Replacement
- Roof Console Replacement
 Headlining Trim Panel Replacement (Without Sunroof)
Warning: Do not attempt to repair or alter the head impact
energy-absorbing material glued to the headliner or to the garnish
trims. If the material is damaged, replace the headliner and/or the ...
 Instrument Panel Accessory Bezel Replacement
Preliminary Procedure
Remove transmission control cover. Refer to Automatic or Manual Transmission
Control Lever Trim Cover Replacement.
Instrument Panel Accessory Bezel Screw (Qty: 4)
C ...
Other materials:
Safety Belt Reminders
Driver Safety Belt Reminder Light
There is a driver safety belt reminder light on the instrument cluster.
When the vehicle is started, this light flashes and a chime may come on to remind
the driver to fasten their safety belt. Then the light stays on solid until the
belt is buckled.
This c ...
Inflatable Restraint Seat Position Sensors - If Equipped
The inflatable restraint seat position sensor is used to determine the
proximity of a front driver or passenger seat position with respect to
the frontal air bag. The seat position sensor interfaces with the inflatable
restraint sensing and diagnostic module (SDM). The state of the
seat positi ...
Frame and Underbody
Specifications
Engine Shield Replacement
Preliminary Procedure
Raise and support the vehicle. Refer to Lifting and Jacking the Vehicle.
Engine Shield Bolt (Qty: 4)
Caution: Refer to Fastener Caution in the Preface section.
Tighten
40 N·m (30 lb ft)
Engine Shield
Front Comp ...
