Chevrolet Cruze Repair Manual: Exhaust Flexible Pipe Replacement (1.6L LXT)
Removal Procedure
Warning: Refer to Hot Exhaust System Warning in the Preface section.
Warning: Refer to Protective Goggles and Glove Warning in the Preface section.
- Open the hood.
- Raise the vehicle by its full height. Refer to Lifting and Jacking the Vehicle.
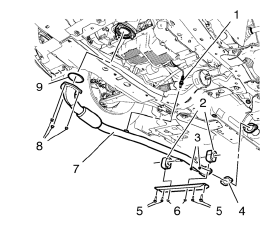
- Remove the heated oxygen sensor (1).
- Remove the 4 exhaust flexible pipe bracket bolts (5).
- Remove the 3 exhaust flexible pipe nuts (8).
- Remove the 2 exhaust flexible pipe nuts (3).
- Remove the exhaust flexible pipe (7).
- Remove the gasket (9).
- Remove the gasket (4).
Installation Procedure
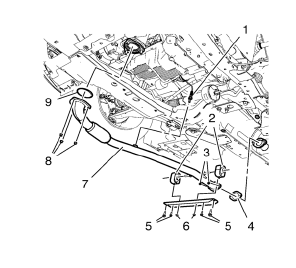
- Install a NEW gasket (4).
- Install a NEW gasket (9).
- Install the exhaust flexible pipe (7).
Caution: Refer to Fastener Caution in the Preface section.
- Install 2 NEW exhaust flexible pipe nuts (3) and tighten to 20 N·m(15 lb ft).
- Install 3 NEW exhaust flexible pipe nuts (8) and tighten to 20 N·m(15 lb ft).
- Install the 4 exhaust flexible pipe bracket bolts (5) and tighten to 40 N·m(30 lb ft).
- Install the heated oxygen sensor (1) and tighten to 40 N·m(30 lb ft).
- Lower the vehicle by its full height.
- Close the hood.
 Battery Negative Cable Disconnection and Reconnection
Removal Procedure
Turn on the radio and record all of the customer radio station presets.
Ensure that all lamps and accessories are turned off.
Turn the ignition OFF and remove the ignition ke ...
 Power Steering Pump Belt Replacement
Special Tools
CH 49800 Installer Power Steering Pump Belt
For equivalent regional tools, refer to Special Tools.
Removal Procedure
Caution: Do not use belt dressing on the drive belt. Belt dressin ...
Other materials:
Hydraulic Clutch
For vehicles with a manual transmission, it is not necessary to regularly check
brake/clutch fluid unless there is a leak suspected.
Adding fluid will not correct a leak.
A fluid loss in this system could indicate a problem. Have the system inspected
and repaired.
When to Check and What to Us ...
Body Side Trim Panel Replacement - Left Side
Preliminary Procedure
Remove the rear side door sill trim plate. Refer to Rear Side Door Sill
Trim Plate Replacement.
Remove the rear seat back. Refer to Rear Seat Replacement.
Remove the quarter window garnish molding. Refer to Quarter Window
Garnish Molding Replacement.
...
Driver or Passenger Seat Retractor Side Belt Replacement
Warning: Refer to SIR Warning in the Preface section.
Warning: In order to prevent accidental deployment and the risk of personal
injury, do not dispose of an undeployed inflatable
restraint seat belt pretensioner as normal shop waste. Undeployed seat belt
pretensioners contain substance ...
