Chevrolet Cruze Repair Manual: Rear Side Door Window Replacement
Preliminary Procedures
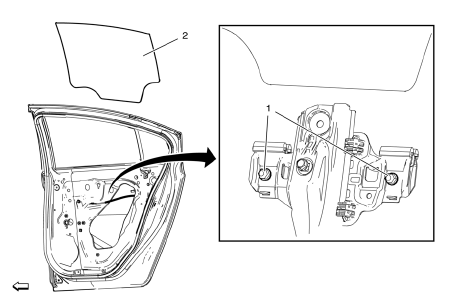
- Position the window approximately half way down in the door.
- Remove the water deflector. Refer to Rear Side Door Water Deflector Replacement.
- Remove the outer sealing strip. Refer to Rear Side Door Window Outer Sealing Strip Replacement.
- Rear Side Door Window Regulator Sash Nut (Qty: 2)
Caution: Refer to Fastener Caution in the Preface section.
Tighten 9 N·m (80 lb in)
- Rear Side Door Window
Procedure
- Loosen the window regulator sash nuts, pull upward to release the window from the sash.
- Rotate the rear door window as necessary to remove it from the door.
 Rear Side Door Window Adjustment
Warning: Refer to Glass and Sheet Metal Handling Warning in the Preface
section.
Warning: Refer to Express Window Down Warning in the Preface section.
Preliminary Procedures
Remove the r ...
 Rear Side Door Stationary Window Replacement
Preliminary Procedures
Remove the rear side door trim panel. Refer to Rear Side Door Trim
Replacement.
Remove the rear side water deflector. Refer to Rear Side Door Water
Deflect ...
Other materials:
Installation Procedure
Note: If the location of the original plug weld holes can
not be determined, space the plug weld holes every 40 mm (1½ in).
Drill 8 mm (5/16 in) for plug welding along the edges of the underbody
rear side rail reinforcement as noted from
the original panel.
Clean and ...
StabiliTrak® System
The vehicle has a vehicle stability enhancement system called StabiliTrak. It
is an advanced computer controlled system that assists with directional control
of the vehicle in difficult driving conditions.
StabiliTrak activates when the computer senses a difference between the intended
path, ...
Low-Profile Tires
If the vehicle has P225/45R18 size tires, they are classified as low‐profile
tires. These tires are designed for very responsive driving on wet or dry pavement,
however, may produce more road noise and tend to wear faster.
Notice: Low-profile tires are more susceptible to damage from road ...
